
📤 2026 RCC Project Submission
Learn and prepare here in MRT eLearning. Official rules and all final submissions are managed only through the RCC website.
MRT Robotics 402 — Node Board Block Coding
Build and control robots with Scratch-style blocks in MRT AI Studio, then continue through 451 AI, 452 sensors and 471 vision and voice.
Try 2 free preview lessons. No account or registration required.
About this course & what you need
What you will learn
- Scratch robot control
- Build and code activities
- Different mainboard from 401
- Foundations for AI 451
Who this course is for
Basic assembly and an interest in block coding
Equipment
Matching 402 mainboard and robot kit; check the lesson-specific connection and software requirements.
Device & connection
Computer with MRT AI Studio and the supported Node USB or Node Bluetooth connection for the selected lesson.
How to Code with Node Blocks
402 · FIRST BOARD SETUP · 01
From a new board to your first saved program.
You do not need any coding experience. We will prepare your board, connect it to Studio and upload a safe program that keeps the motors stopped.
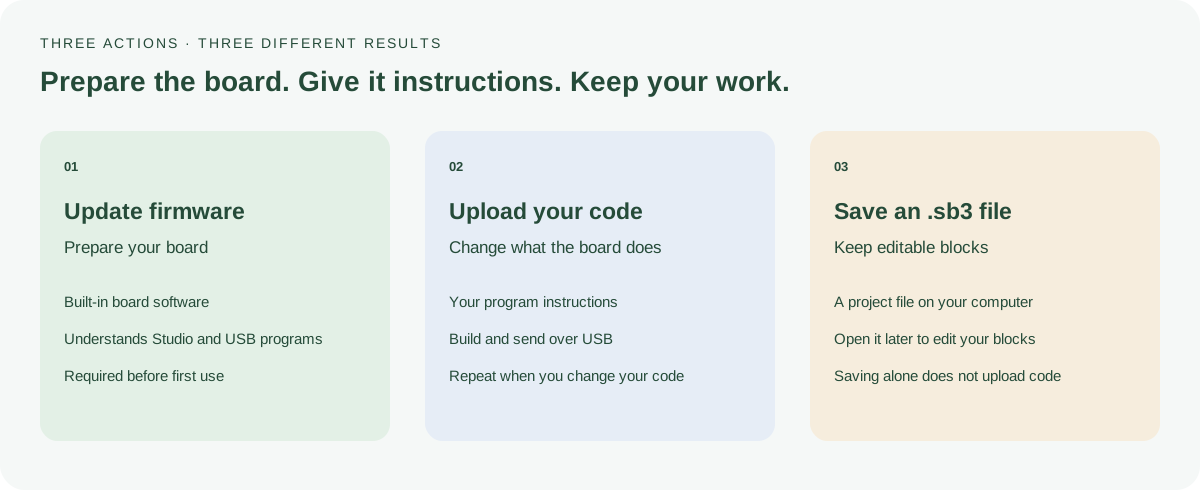
What is firmware?
Firmware is the software already inside your Node board. It lets the board understand Studio commands, receive a USB program and run that program.
Why update a new board?
A new board may still have factory firmware that does not understand the current Studio program format. Install the approved MRT Node firmware before your first project.
By the end, you can…
- Point to the correct USB connector on your board.
- Explain the difference between firmware, code upload and an .sb3 file.
- Update a new board and recognise a verified completion message.
- Open, save and upload a simple Node USB program.
Allow about 30–40 minutes for your first lesson. A first firmware installation may take about 10 minutes because Studio preserves the original board before writing.
402 · FIRST BOARD SETUP · 02
One USB data cable. Two ends.
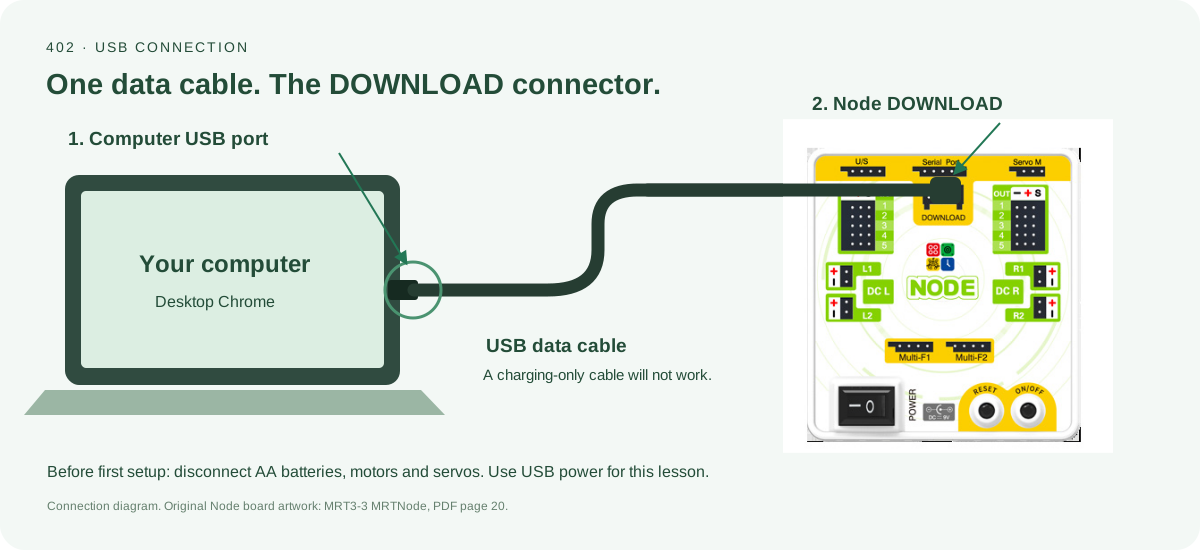
Find your Node board, a USB data cable and a computer running desktop Chrome. A cable that only charges a device cannot transfer a program.
-
Before connecting: disconnect AA batteries, motors and servos for this first setup. The current release may briefly activate L2 at power-on.
-
Board end: fit the cable into the connector labelled DOWNLOAD at the top centre of Node.
-
Computer end: plug the USB connector into your computer. If the computer has only USB-C ports, use a suitable USB data adapter.
-
Keep it connected: use USB power for this non-motion lesson. Leave the other board sockets empty.
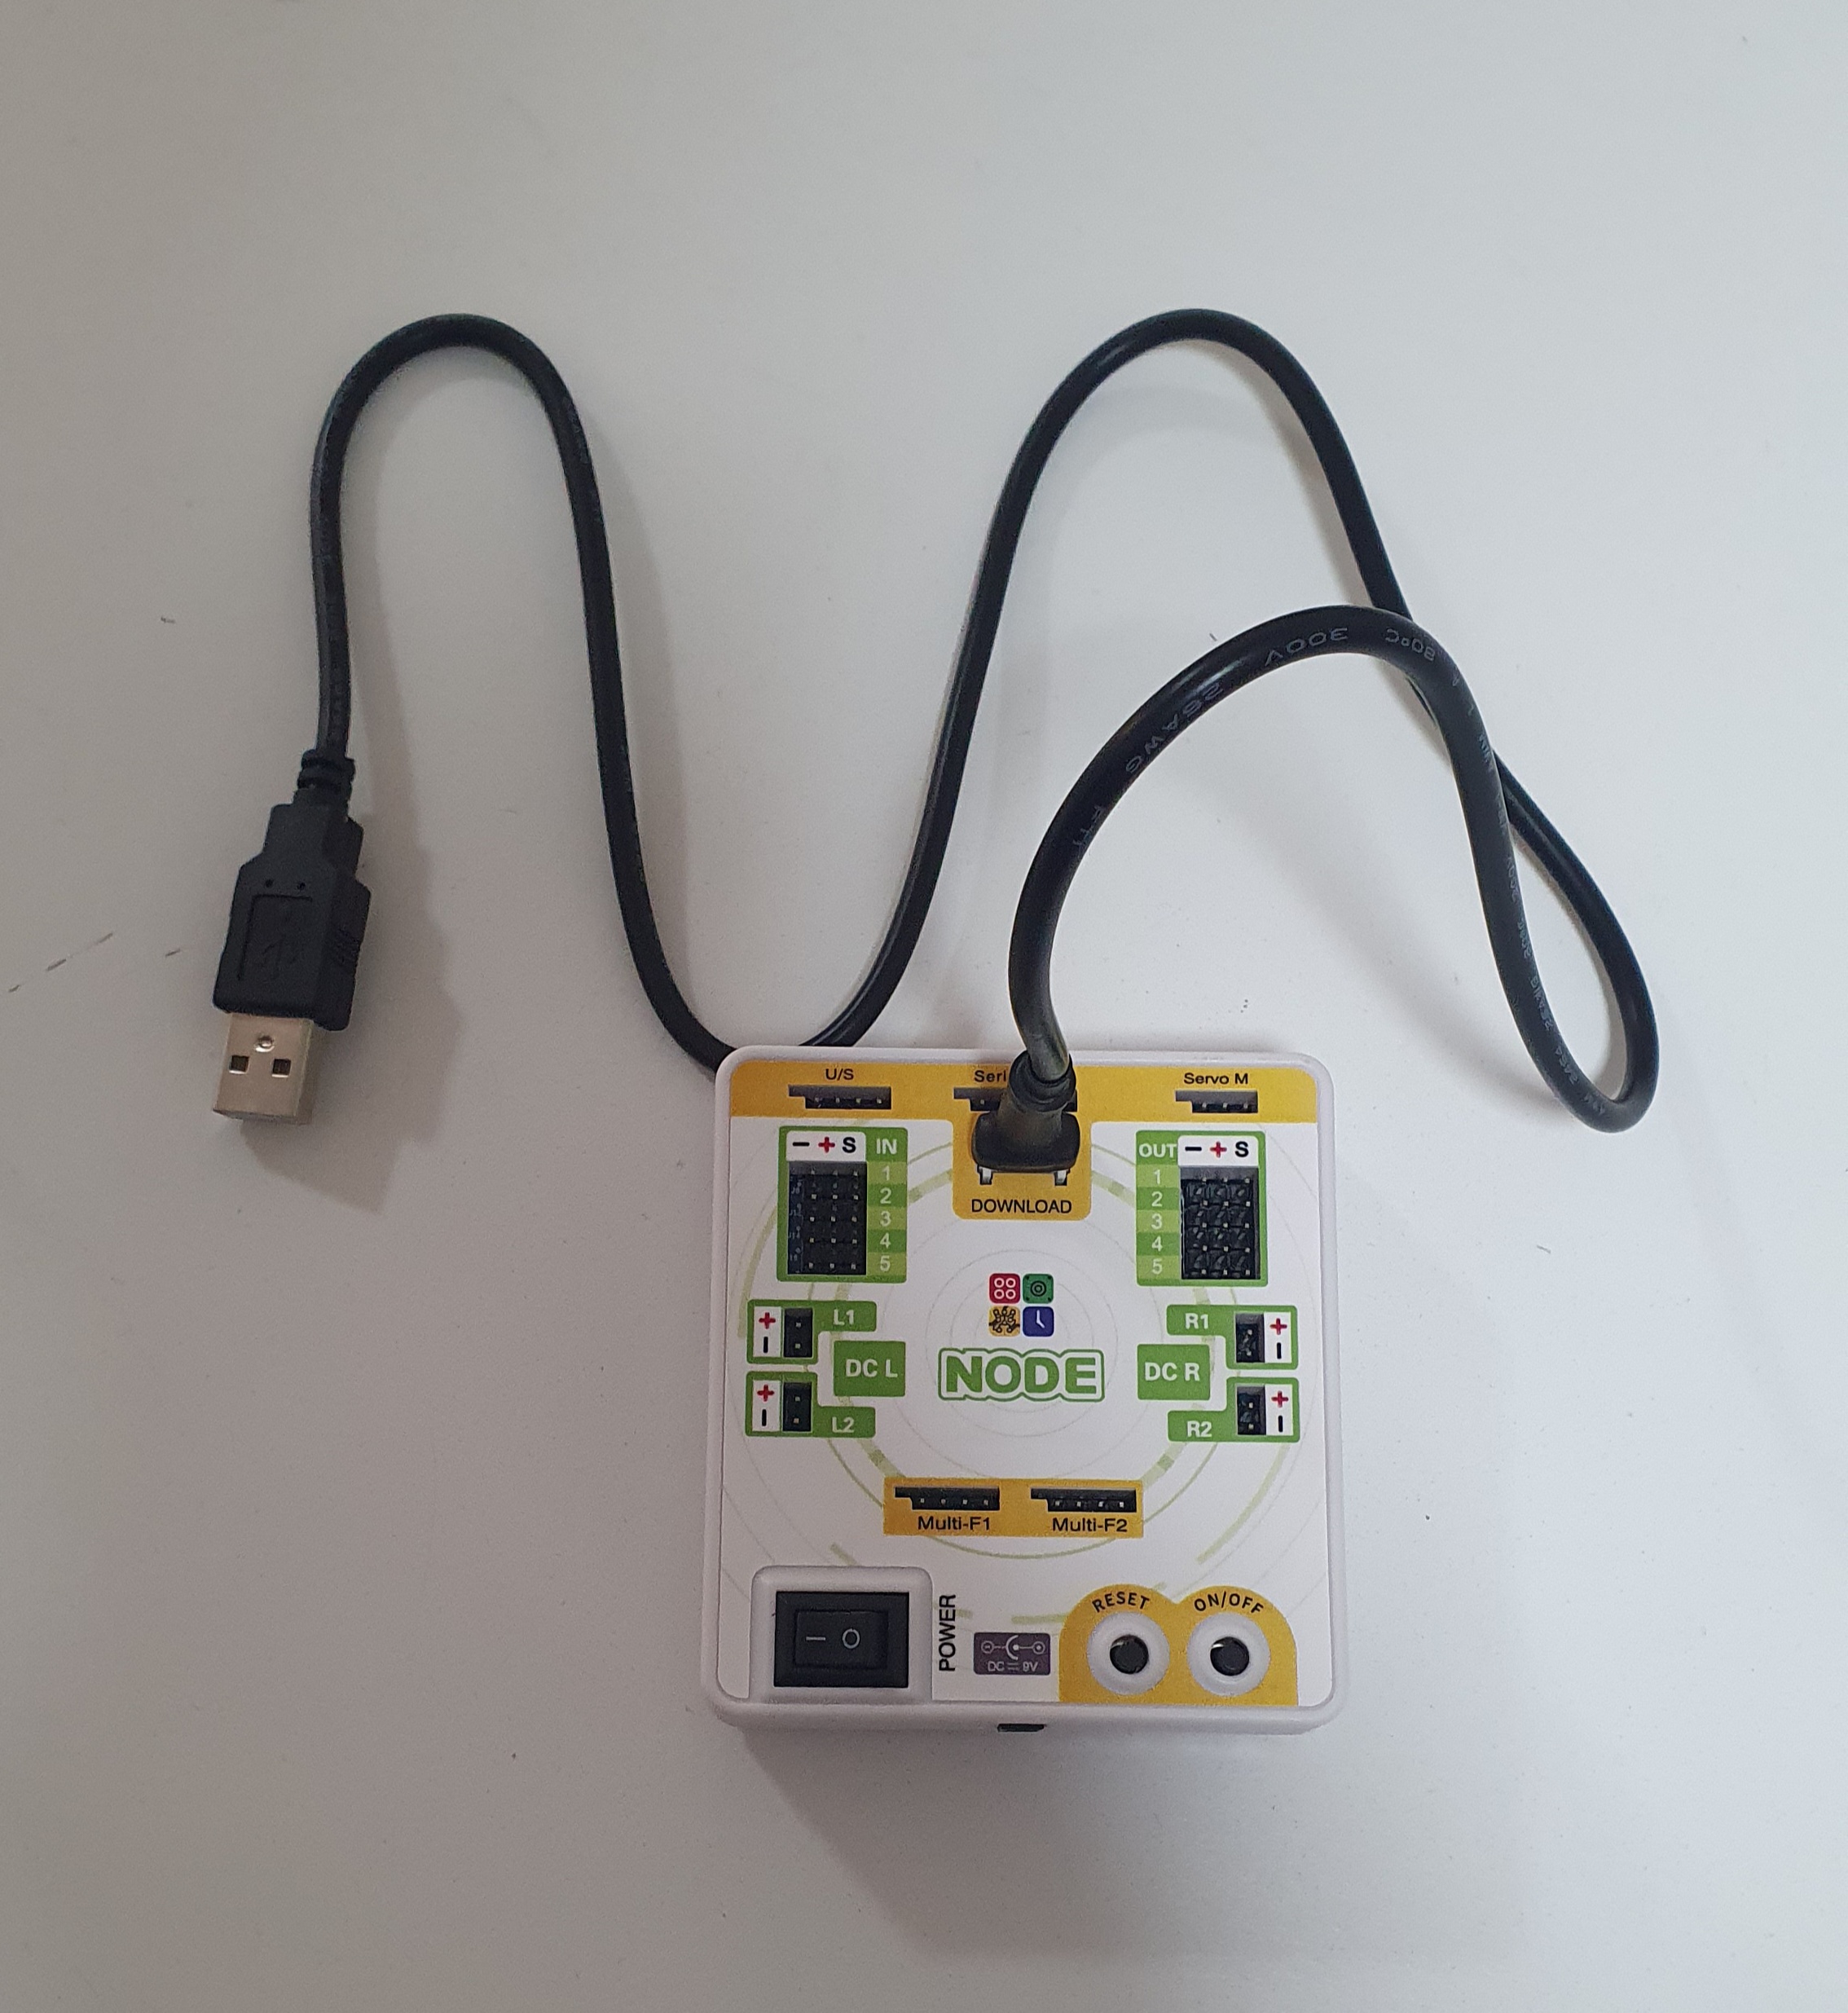
My board powers on, but no USB device appears
Power alone does not prove that the cable carries data. Try a known data cable, check both ends, try another computer port and close other apps using this board.
402 · FIRST BOARD SETUP · 03
Open Studio. Choose the right path.
Open Studio from this course so your access carries through. Keep the editor language set to English.
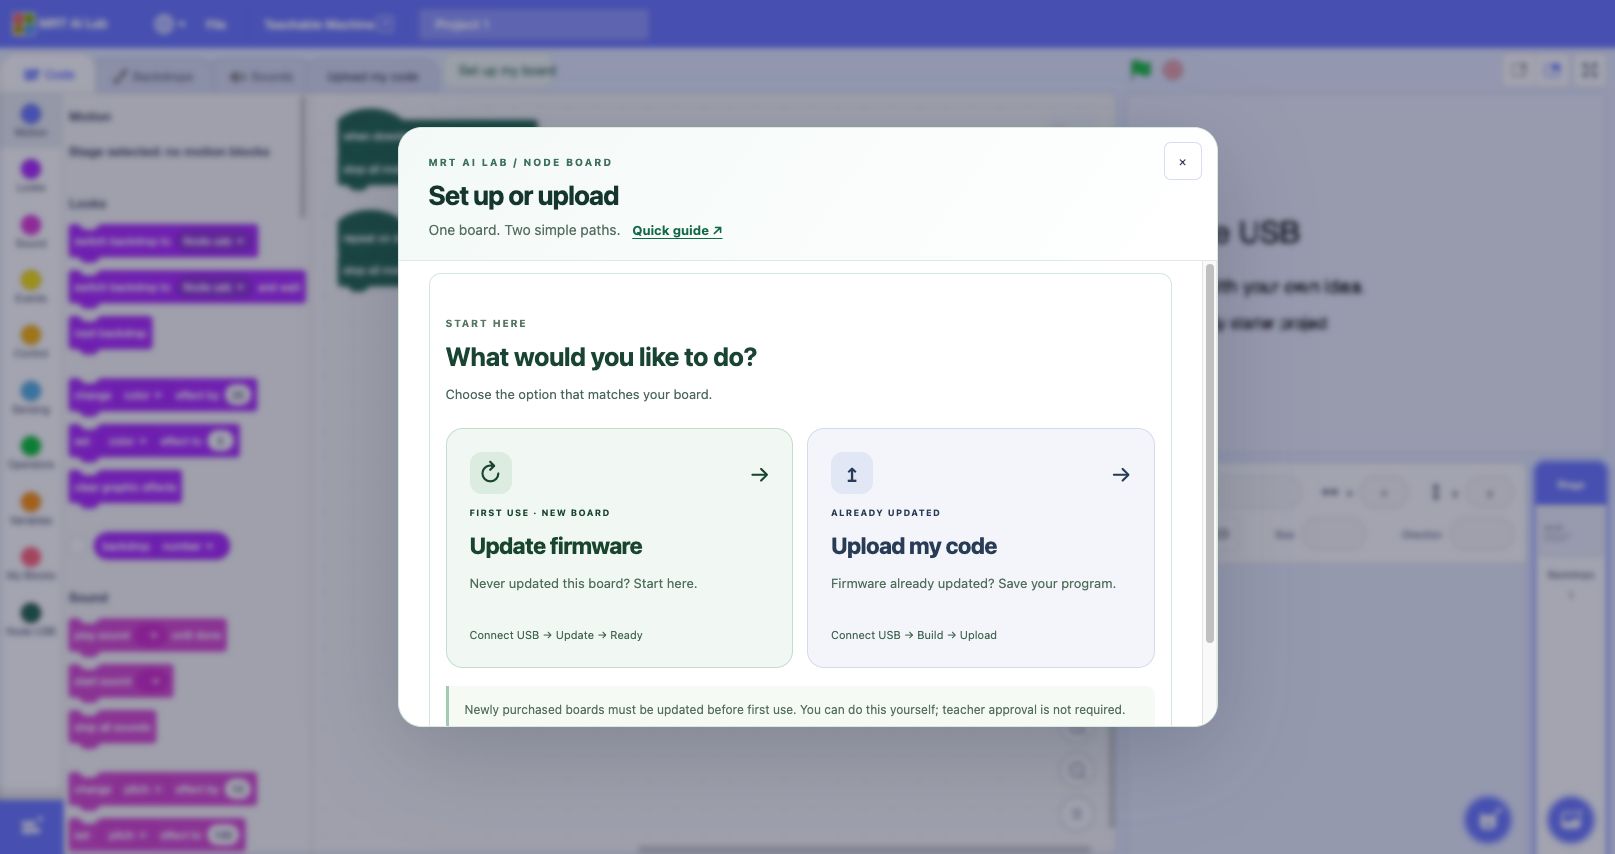
Update firmware
Start here before first use. You can do the update yourself; teacher approval is not required.
Upload my code
Start here for your next project. Studio checks the connected board before you build.
-
Choose Update firmware if this board has never been updated. Otherwise choose Upload my code.
-
Click 1. Connect USB board.
-
In the browser’s device list, select USB Serial for your Node board, then click Connect.
-
Wait for the check. A factory board may take up to about 15 seconds to identify. If Studio says an update is needed, choose Update firmware first →.
Where are these choices if the start window is closed?
Click Set up my board beside the Code tab to open both choices. Upload my code opens the everyday upload path directly.
402 · FIRST BOARD SETUP · 04
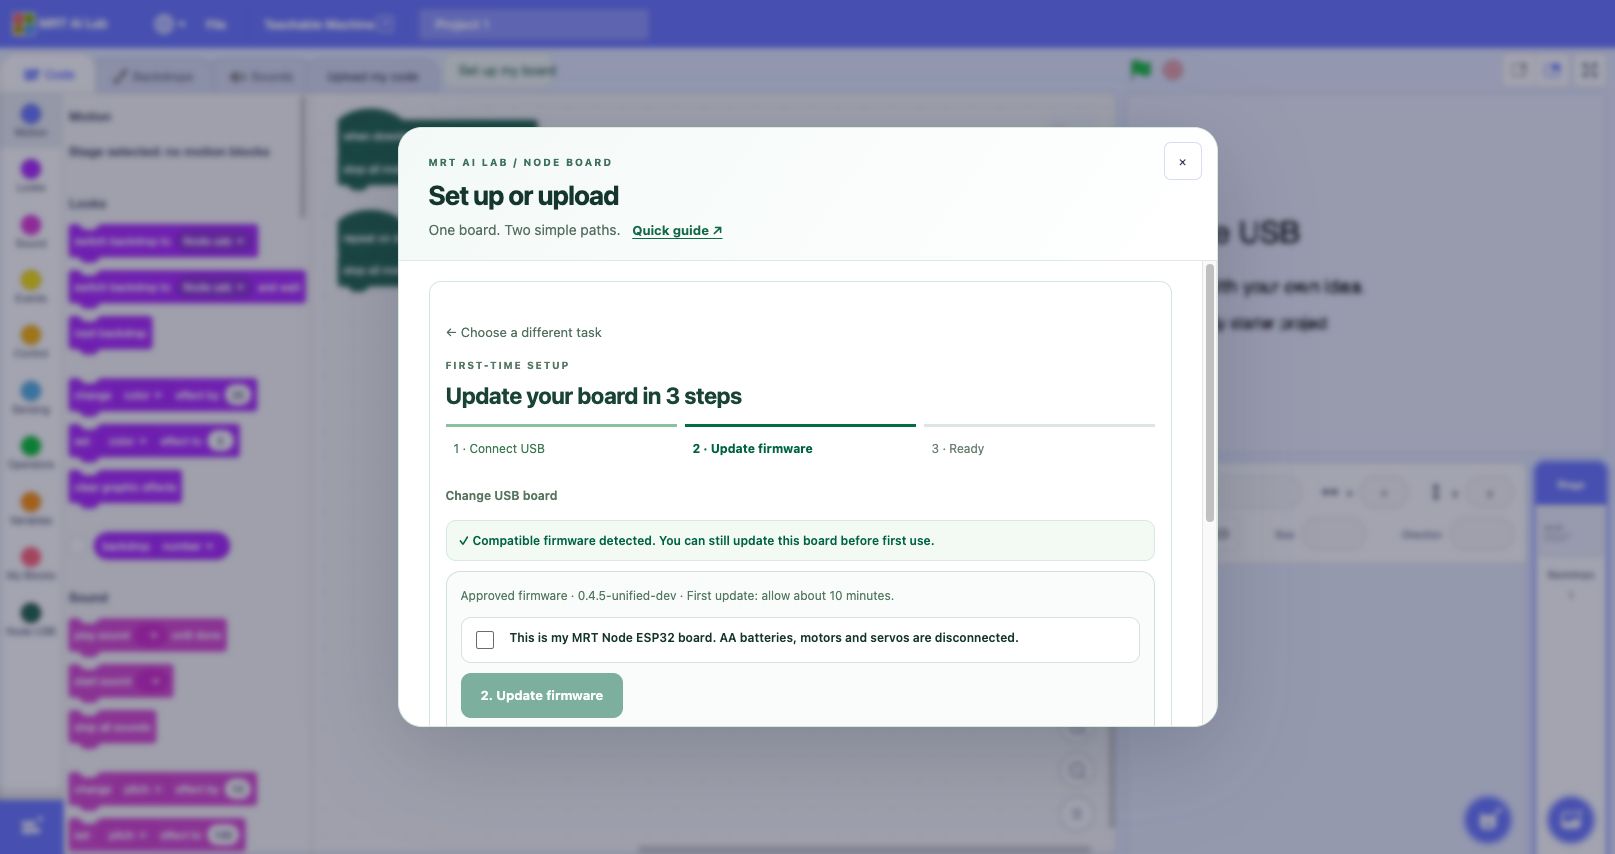
First update: connect → update → ready.
If this board has already been updated, use Upload my code and continue to the next activity. Do not reinstall firmware for every program.
-
Check that this is your Node ESP32 board and that AA batteries, motors and servos are disconnected. Tick the confirmation box.
-
Click 2. Update firmware once.
-
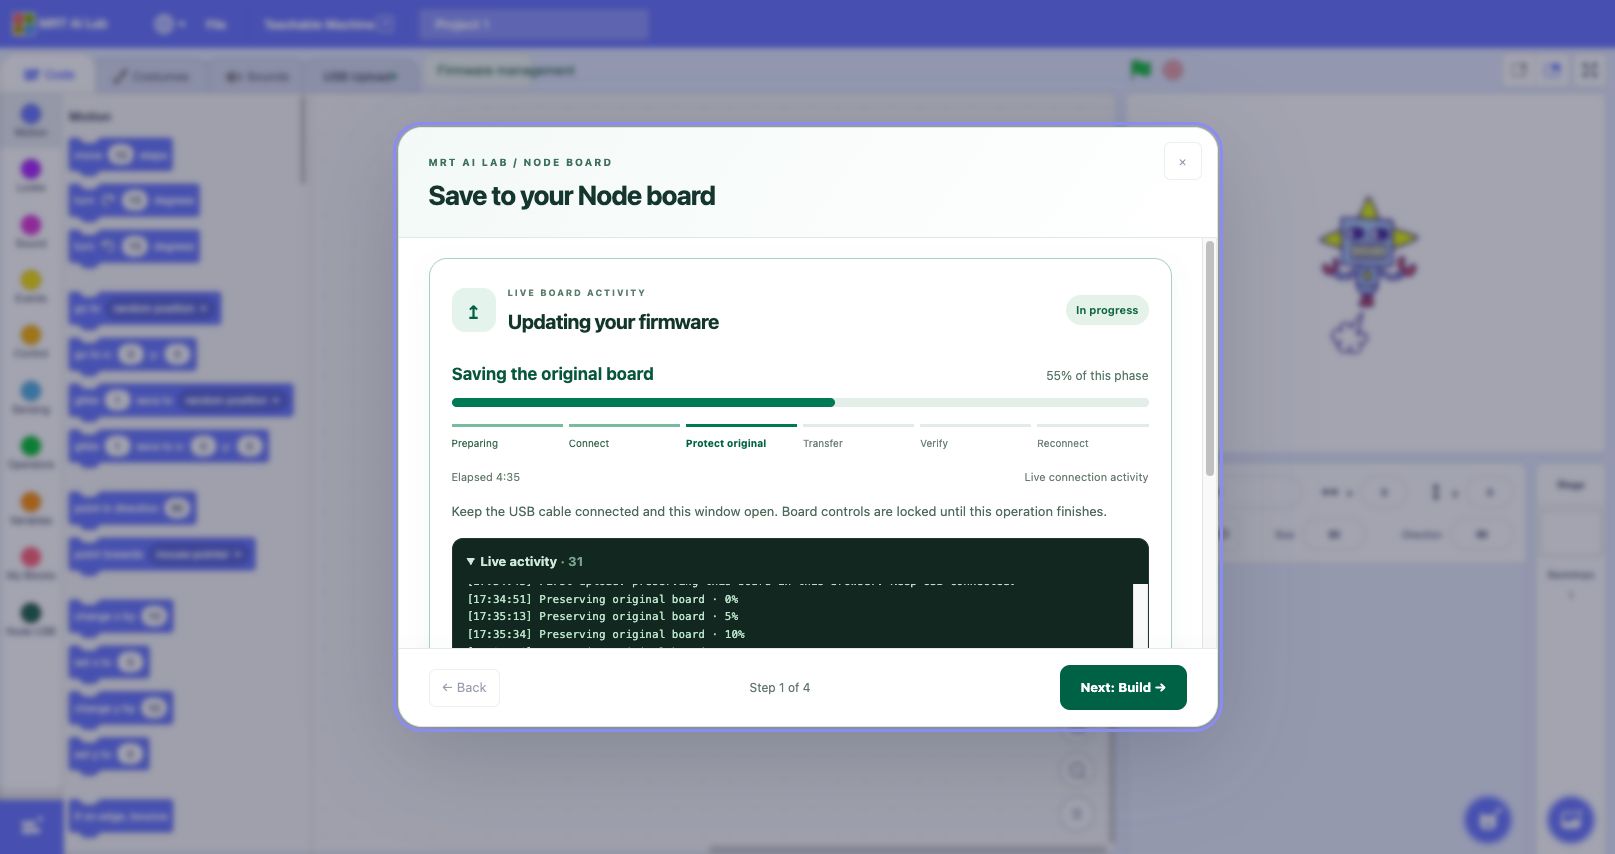
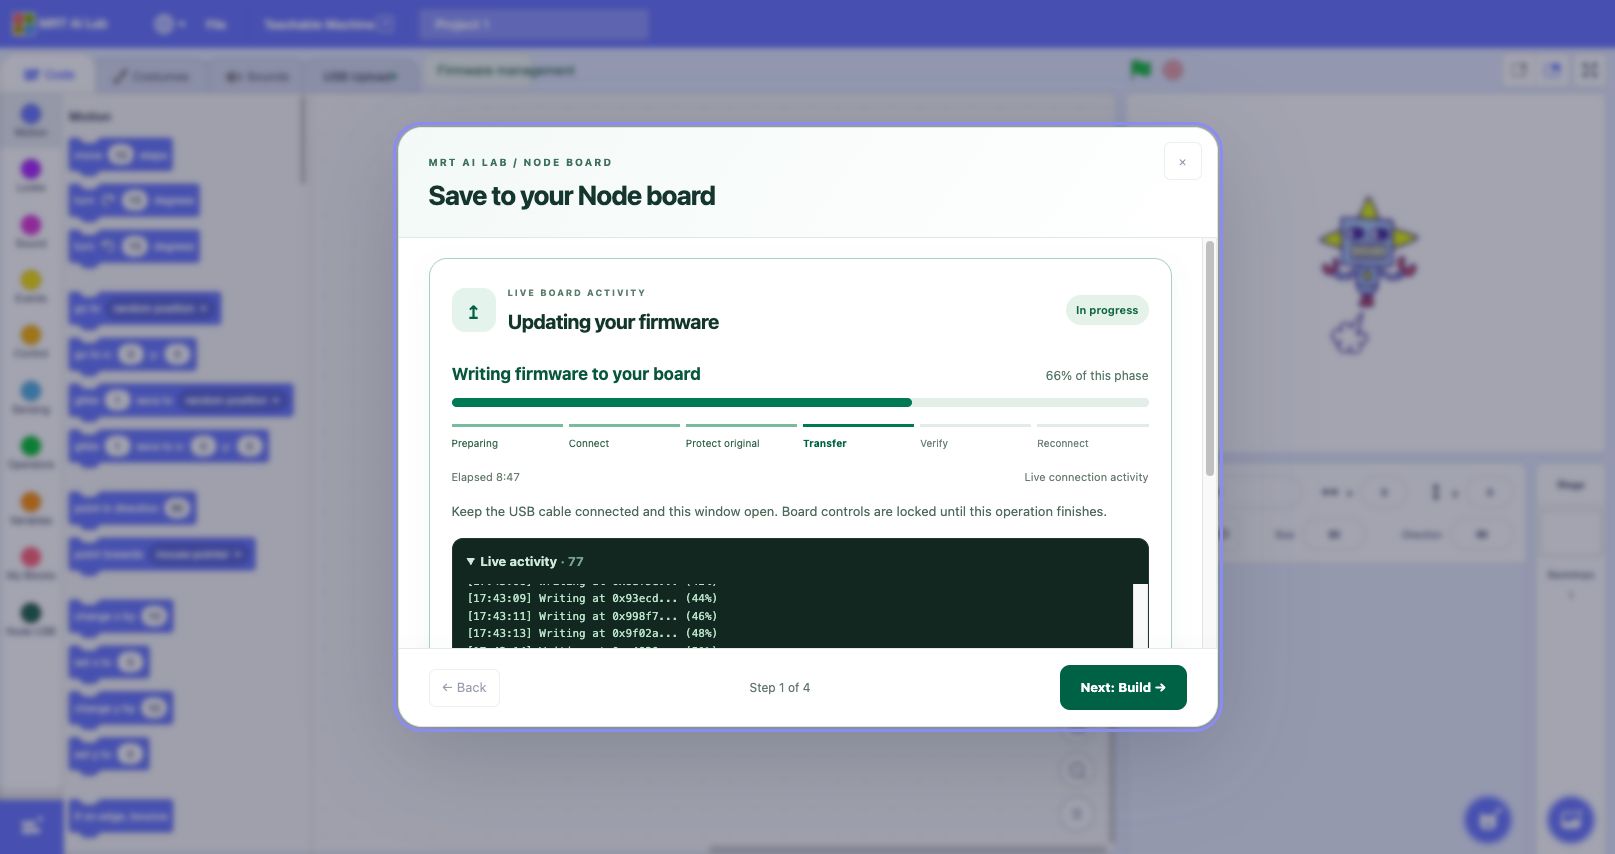
Keep the USB cable connected and the Studio window open. Watch the stage name, progress bar, elapsed time and live log.
-
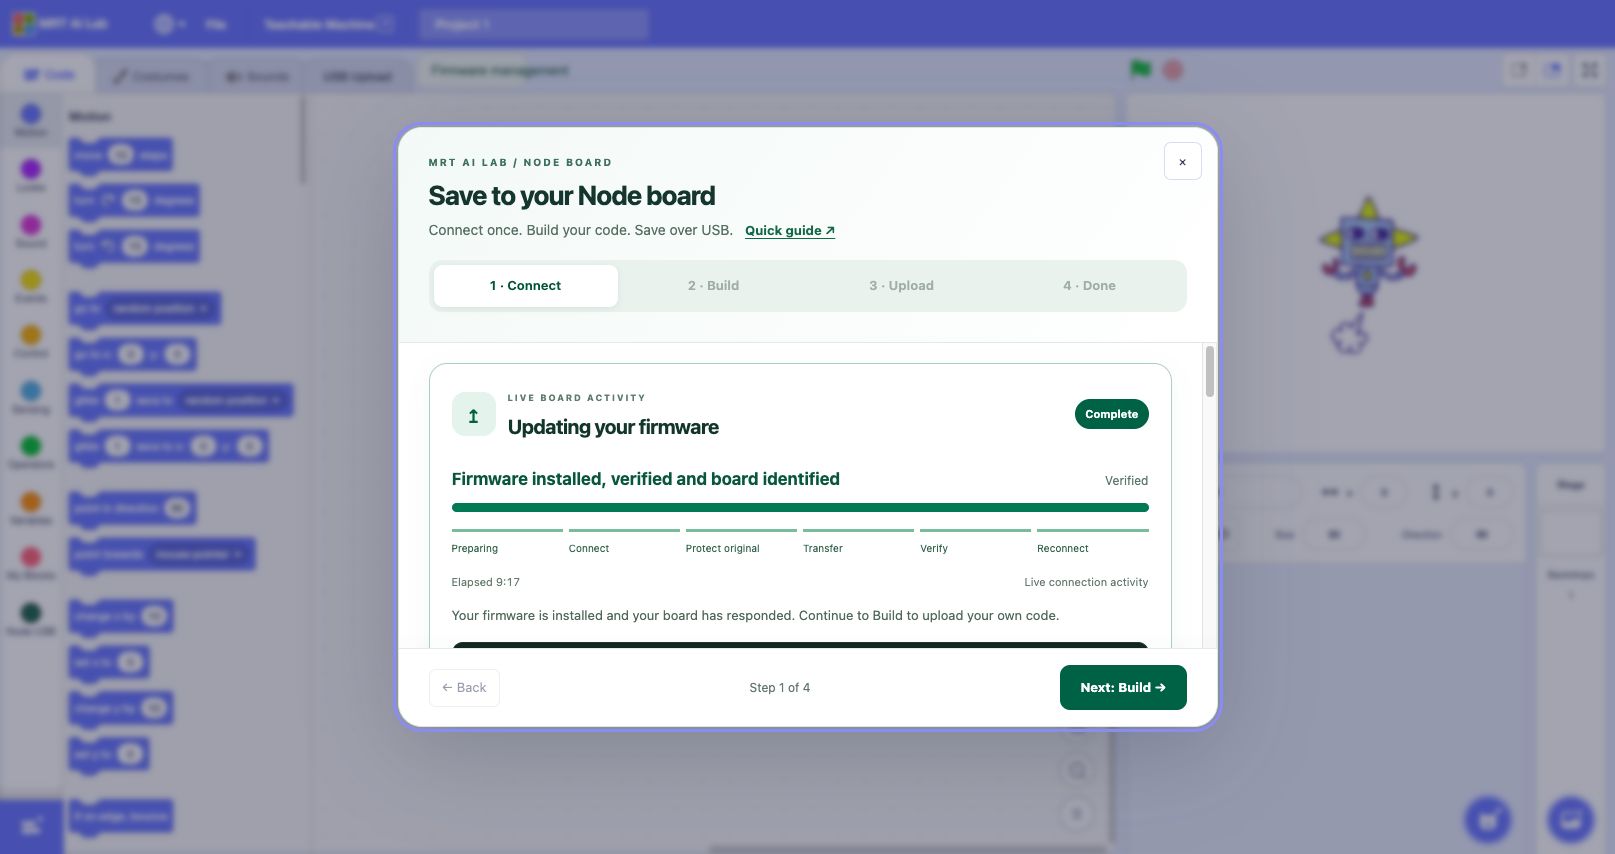
Wait for memory verification and the board’s reply after restart. A transfer reaching 100% alone is not the final result.
-
When the board is ready, choose 3. Continue to my code →.
What will I see while I wait?
What if an error appears?
Read the error and copy the log. Do not treat a failed transfer as a completed update. Recheck the cable, close other serial tools and select the board again. If memory verification failed or the board no longer responds, use the saved original-board recovery tools or contact support before trying unrelated firmware files.
Why keep this browser’s site data?
The original-board recovery copy belongs to this board and is saved in this browser. Keep the site data if you may need to restore the original board. The image is not a firmware file to share with another board.
402 · FIRST BOARD SETUP · 05
Make a program that keeps the motors stopped.
Choose Node USB. If the green Node USB category is missing, click Add Extension → Node USB.
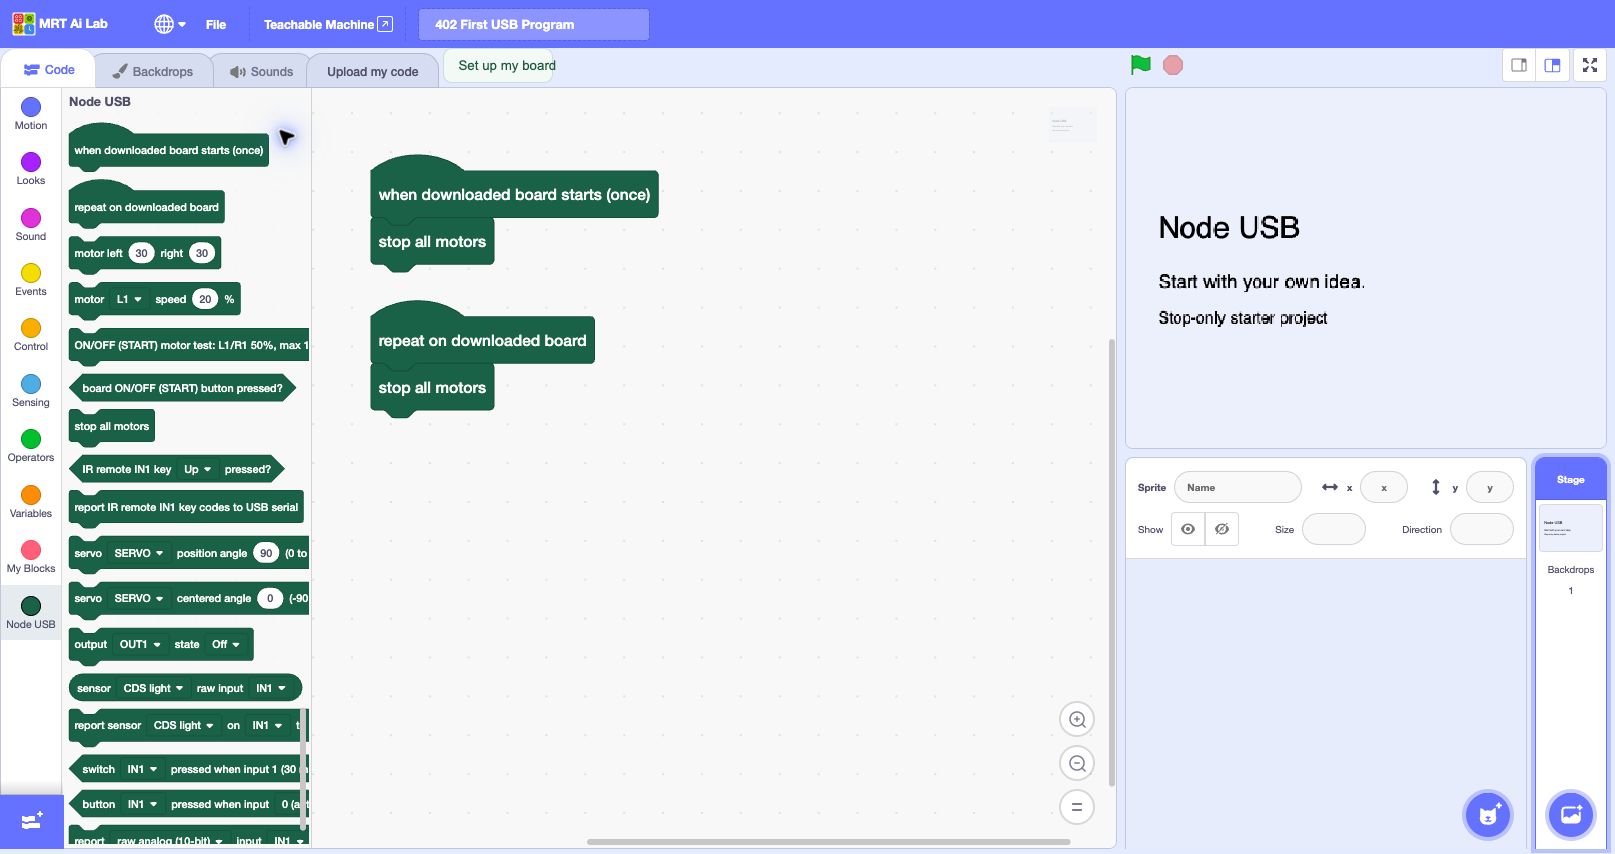
Start in a stopped state
when downloaded board starts (once)
Attach stop all motors underneath.
Keep checking the stop rule
repeat on downloaded board
Attach another stop all motors underneath.
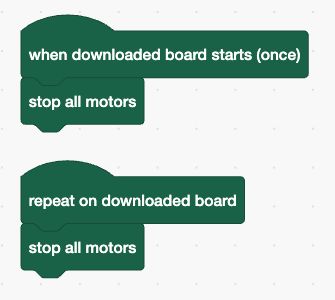
Download this exact project (.sb3)
-
Open Projects → New Node USB project in the upload tools, or load the downloadable project with File → Load.
-
Check that both green start stacks are present and each has stop all motors attached.
-
Give the project a clear name, such as 402 First USB Program.
-
Say what runs once and what repeats before you upload.
402 · FIRST BOARD SETUP · 06
Keep a copy you can edit.
Your .sb3 file stores the editable blocks. You can save it before or after uploading.
-
Choose File → Save in the current Studio. Save the .sb3 file to a folder you can find again.
-
To reopen it, choose File → Load. You can also use Projects → Open .sb3 file in the upload tools.
-
Check that both start stacks return. Add a comment explaining your stop rule or rename the project.
-
Save a new version when you make an important change. Keep a known working copy.
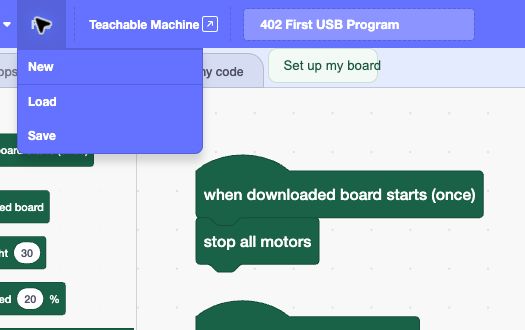
The blocks did not return
Check the filename ends in .sb3, not .bin. Open the project in Studio and choose Node USB. If replacing an existing project, save that project first.
402 · FIRST BOARD SETUP · 07
Already updated? Build → upload → verified.
Leave your USB data cable connected. Use Upload my code for your own Node USB project.
-
Choose Upload my code, connect the correct USB board and wait for Firmware ready.
-
Click 2. Continue to Build →. Check or open your project using Projects.
-
Click Build program. A successful build moves directly to the upload screen.
-
Tick the board confirmation, then click Upload to board.
-
Watch the live activity card. Wait for Program saved, checked and started.
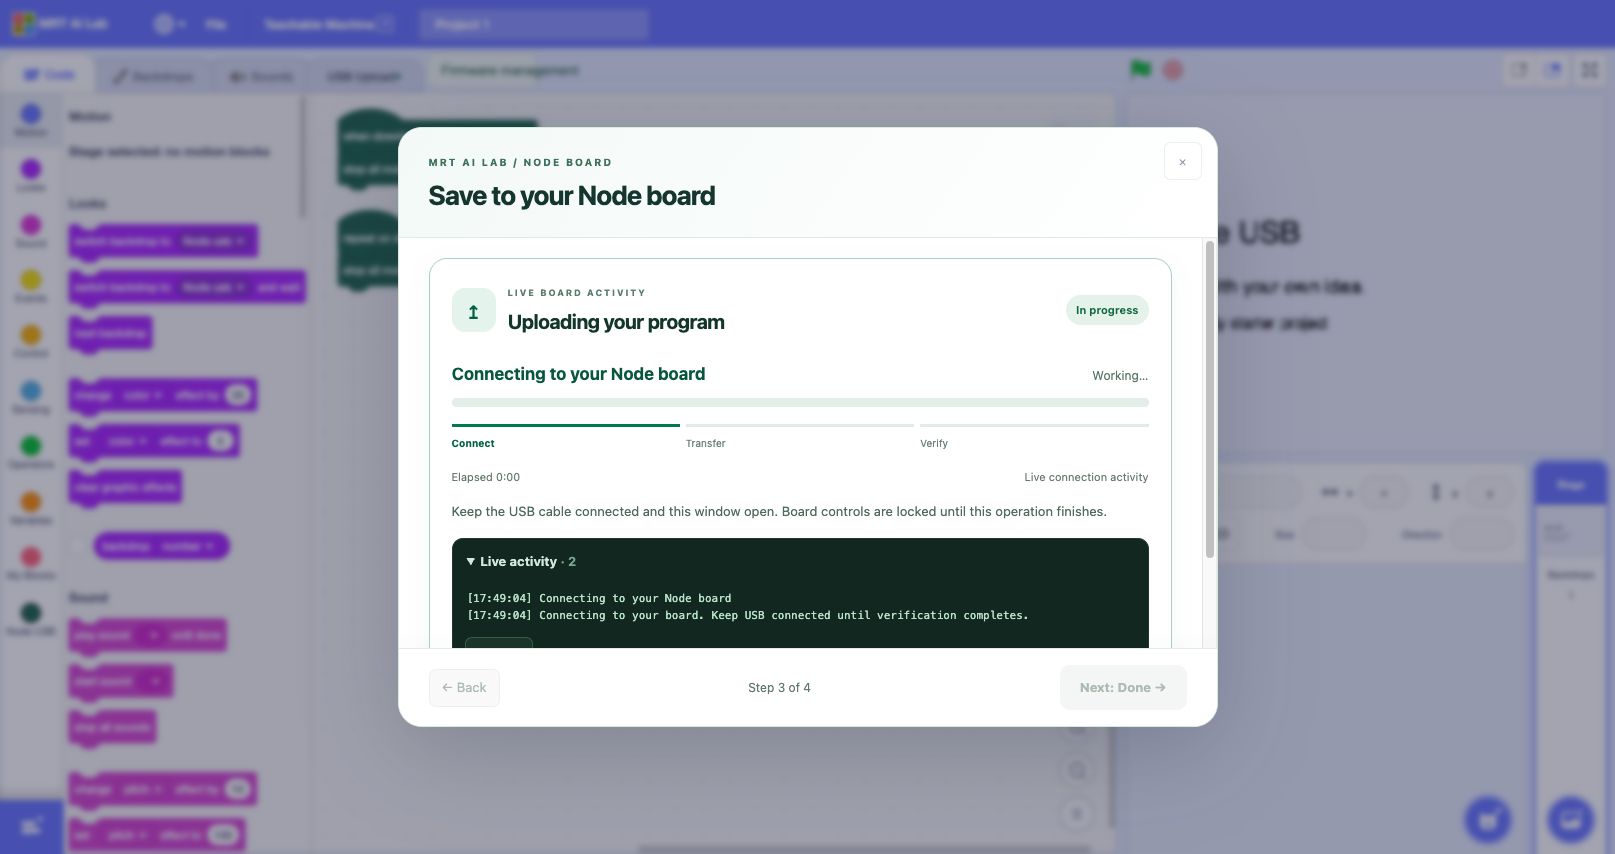
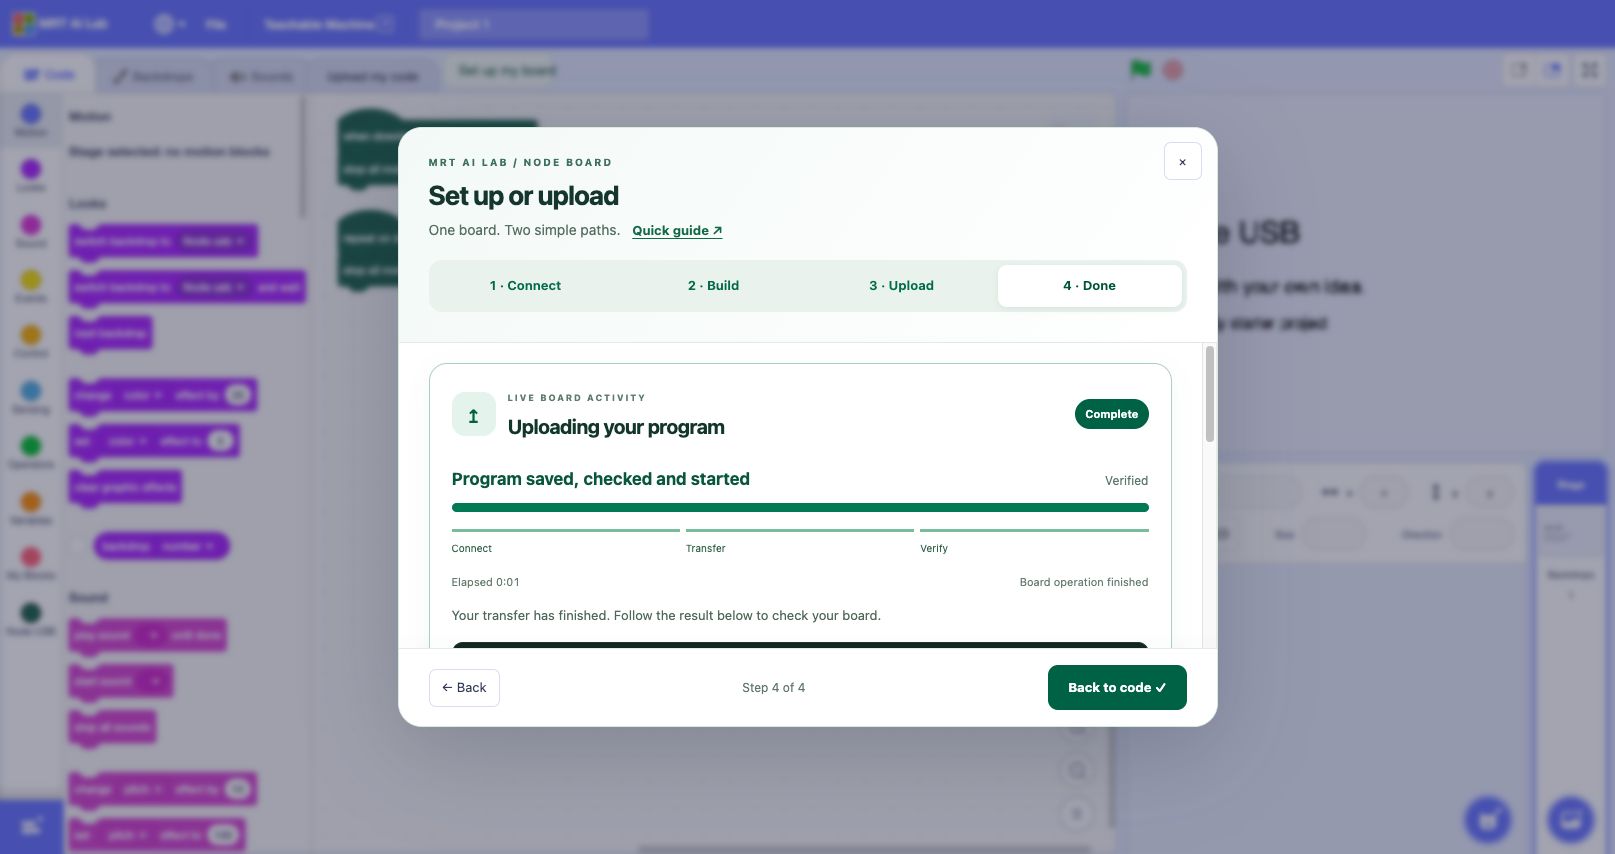
After a restart
The saved program stays on the board. After power-on, press and release ON/OFF (START) to run the saved program. This stop-only example still produces no movement. Use Studio’s Stop control to stop a connected board program.
Build failed or upload is unavailable
Check that the project uses Node USB, both green start stacks are present and the commands are attached. If you changed your blocks after building, build again. If the project uses Node Bluetooth blocks, open a Node USB project for a stored board program.
402 · FIRST BOARD SETUP · 08
Your first success is a verified program.
Show these five things
- I can point to the board’s DOWNLOAD connector and the computer end of the cable.
- I know whether this board needed its first firmware update.
- I can identify the start-once and repeat stacks in my Node USB project.
- I can reopen my .sb3 file and find the same blocks.
- I can show a verified upload result and explain why this program does not move.
Node USB
The stored program runs on the board. USB is needed for upload. Later standalone use needs a suitable power supply and the lesson’s hardware checks.
Node Bluetooth
Studio sends commands live. Keep Studio and Bluetooth connected. It uses different project blocks; changing a cable does not convert a USB project into a Bluetooth project.
Quick check 1: Must I reinstall firmware after changing one block?
No. Build and upload your changed program. Update firmware when first preparing a new board or when an approved new release is required.
Quick check 2: I saved an .sb3 file. Is it now on my board?
No. Save keeps editable blocks on your computer. Use Build program and Upload to board to send the program to Node.
Quick check 3: Nothing moved. Did the first program fail?
Not necessarily. The stop-only project is meant to keep motors stopped. Look for the verified upload result rather than movement.
My first-program record
Write your answers here or in your learning journal. These notes are not submitted automatically.
Download the setup checklist (.txt)
Next: use the model lesson to add a button-controlled motor rule. Keep the initial stopped state and explain the stop condition before connecting a mechanism.
Lesson Completion
Free preview: course progress is saved only with valid course access.
The free previews above do not require an account.


